1
2
3
4
5
6
7
8
9
10
11
12
13
14
15
16
17
18
19
20
21
22
23
24
25
26
27
28
29
30
31
32
33
34
35
36
37
38
39
40
41
42
43
44
45
46
47
48
49
50
51
52
53
54
55
56
57
58
59
60
61
|
# Build Instructions
The following steps will allow you to compile your own NorthstarLauncher executable from the code in this repository. If you still have questions, you may ask in the [Discord Server](https://discord.gg/northstar)
*This guide assumes you have already installed Northstar as shown in [this page](https://r2northstar.gitbook.io/r2northstar-wiki/installing-northstar/basic-setup)*
## Windows
### Steps
1. **Install Git** from [this link](https://git-scm.com)
2. **Clone** the [R2Northstar/NorthstarLauncher](https://github.com/R2Northstar/NorthstarLauncher) repo with submodules using this command `git clone --recurse-submodules https://github.com/R2Northstar/NorthstarLauncher.git`
3. **Install Visual Studio 2022** from [this link](https://visualstudio.microsoft.com/downloads/). Northstar uses the vc2022 compiler, which is provided with Visual Studio. *You only need to download the Community edition.*
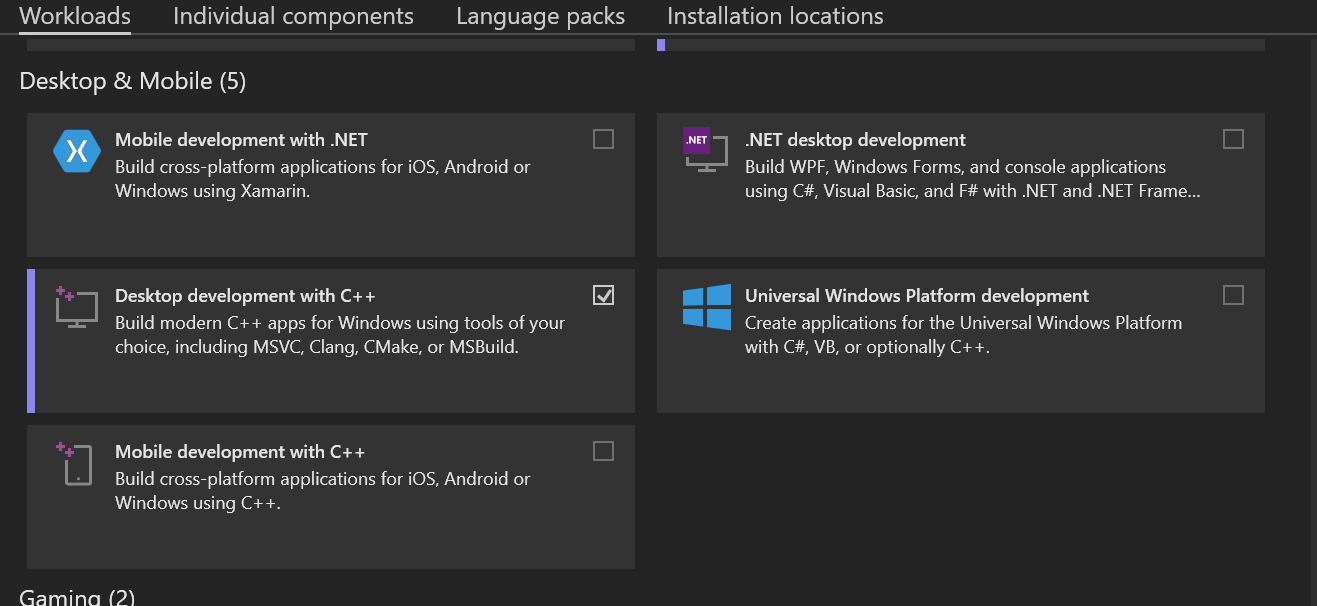
4. If you are prompted to download Workloads, check "Desktop Development with C++" If you are not prompted, don't worry, you'll be able to install this later on as well.

6. **Open the NorthstarLauncher folder** you unzipped with Visual Studio.
7. You may be prompted by visual studio to generate the cmake cache. To do this open the root `CMakeLists.txt` and click **Generate**. Once you do this you should be able to build the project.

8. In the top ribbon, press on **Build,** then **Build all.**

9. Wait for your build to finish. You can check on its status from the Output tab at the bottom
10. Once your build is finished, **Open the directory in File Explorer.** Then, go to `build/game`. You should see NorthstarLauncher.exe and Northstar.dll, as well as a couple other files.
11. **_In your Titanfall2 directory_**, move the preexisting NorthstarLauncher.exe and Northstar.dll into a new folder. You'll want to keep the default launcher backed up before testing any changes.
12. Back in the build debug directory, **Move NorthstarLauncher.exe and Northstar.dll to your Titanfall2 folder.**
If everything is correct, you should now be able to launch the Northstar client with your changes applied.
Alternatively you can move your game to the `build/game/` folder and launch directly from visual studio instead of copying the files manually.
### VS Build Tools
Developers who can work a command line may be interested in using [Visual Studio Build Tools](https://visualstudio.microsoft.com/downloads/#build-tools-for-visual-studio-2022) to compile the project, as an alternative to installing the full Visual Studio IDE.
- Follow the same steps as above for Visual Studio Build Tools, but instead of opening in Visual Studio, run the Command Prompt for VS 2022 and navigate to the NorthstarLauncher.
- Run `cmake . -G "Ninja" -B build` to generate build files.
- Run `cmake --build build/` to build the project.
## Linux
### Steps
1. Clone the GitHub repo
2. Use `cd` to navigate to the cloned repo's directory
3. Then, run the following commands in order:
* `docker build --rm -t northstar-build-fedora .`
* `docker run --rm -it -e CC=cl -e CXX=cl --mount type=bind,source="$(pwd)",destination=/build northstar-build-fedora cmake . -DCMAKE_BUILD_TYPE=Release -DCMAKE_SYSTEM_NAME=Windows -G "Ninja" -B build`
* `docker run --rm -it -e CC=cl -e CXX=cl --mount type=bind,source="$(pwd)",destination=/build northstar-build-fedora cmake --build build/`
#### Podman
When using [`podman`](https://podman.io/) instead of Docker on an SELinux enabled distro, make sure to add the `z` flag when mounting the directory to correctly label it to avoid SELinux denying access.
As such the corresponding commands are
* `podman build --rm -t northstar-build-fedora .`
* `podman run --rm -it -e CC=cl -e CXX=cl --mount type=bind,source="$(pwd)",destination=/build,z northstar-build-fedora cmake . -DCMAKE_BUILD_TYPE=Release -DCMAKE_SYSTEM_NAME=Windows -G "Ninja" -B build`
* `podman run --rm -it -e CC=cl -e CXX=cl --mount type=bind,source="$(pwd)",destination=/build,z northstar-build-fedora cmake --build build/`
|
